How to Upload a Copy of Paper and Change Some Text
Run into below for how to Create a Public Collection for a Social, Political, Historical, Outcome on NowComment
- Start with groups.
- Create a private or public group using the Create Groups push button in the right column next to your library. Terminal names can be hidden in public groups.
OR - Bring together an already existing public group. Run across the public groups, identified with icons on the bottom half of the NowComment home page.
- Invite students, colleagues, or friends to the group that you simply created (and made public or kept private) or joined, using the Invite button in the pinnacle-left corner of the main menu.
- Create a private or public group using the Create Groups push button in the right column next to your library. Terminal names can be hidden in public groups.
- Create or Add together to Group Collections.
- Create a individual or public Group Collection on a Group page using the Create a Group Collection button in the elevation correct corner of any group page.
- Groups are private by default. Any members of a group and anyone you invite to it volition exist able to add to the collections in that group.
- You can cull to make a collection public. Whatever NowComment member can join a public group and be able to add to the collections in that group.
- You lot tin can too add documents yous have already created to already existing public collections in whatever group in which yous are a fellow member.
- Invite students, colleagues, or friends to the collecction that yous only created (and made public or kept individual) or added to, using the Invite button in the top-left corner of the master menu.
- Create a individual or public Group Collection on a Group page using the Create a Group Collection button in the elevation correct corner of any group page.
- Create and Add together Documents to Grouping Collections.
- Add a certificate that you have already created to any public group collection in a group in which you are a member.
OR - Go back to any group in which y'all are a member, and utilise the Upload Document button, in the middle of the main carte du jour to upload videos, images, or texts that y'all want in your new group collection. Then add together those documents to the group collection you created or that you lot are calculation to. You tin can also add documents to collections in the options next to each document in your library.
- Documents are private by default and you can make them public. If you lot add a private document to a public collection, you will exist prompted to agree to making your certificate public when you add it to that public collection. Last names tin be hidden on private and public documents.
- Utilise the Invite button in the left corner of each document (both public or public) to invite others to also join yous on those documents.
- Add a certificate that you have already created to any public group collection in a group in which you are a member.
Create a Public Collection for a Social, Political, Historical, Upshot on NowComment
- Choose the public group where you will make a public group collection. Decide which i of the 17 United nations Sustainable Development Goals near closely relates to your topic, issue, or question. Search the net with a keyword from your topic along with the words "UN Sustainable Evolution Goals" (SDG) and see where your inquiry seems to fit.
- Afterwards choosing your SDG, bring together the report group on NowComment for that SDG. Click here to find the 17 study groups for the United nations Sustainable Development Goals.
- Striking the Create a Grouping Collection button and create a public collection for the videos, images, and texts that you lot want to organize together and share with others.
- Add a document that y'all accept already created to the group collection that you just created.
OR - Go back to the Report Group, and upload videos, images, or texts that you want in your new group collect. Then add together those documents to the group collection y'all created.
- Use the invite buttons to invite others to also join you in three places:
- The UN SDG Report Group where you have created a collection.
- The public group collection.
- Each document you create.
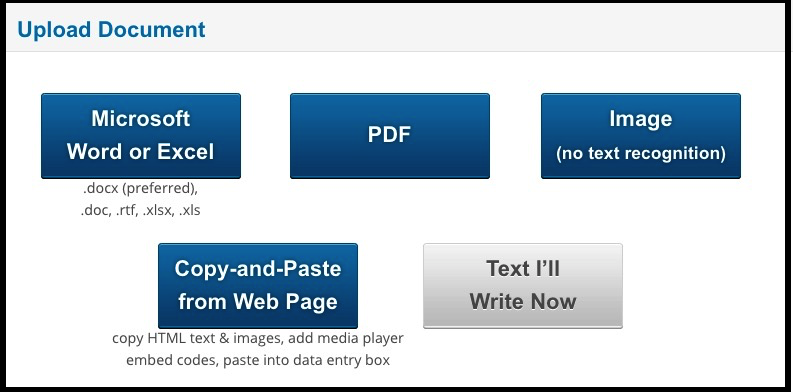
To brand a certificate available on NowComment, click the "Upload Document" link at the meridian of virtually every folio. This will take you lot to our upload page where you can upload documents in any of v file formats:
- Microsoft Word or Excel
- Image (diverse formats, no OCR)
- Web Page (HTML) Content — Text+Images and Video Techniques
- Plain Text
Click the button respective to the file type y'all want to upload to reach the advisable upload window:
If your file type isn't ane of the above (e.g. if it' PowerPoint or LaTeX) and so open up the application you used to create that file and use its File Menu to practice a "Save As" or "Consign" or "Print to PDF" to convert your document to one of the v formats we accept (or perhaps use a 3rd party converter application). Re-create-and-pasting from another format will almost never give good results, east.1000. your certificate may wind upward with white space (carriage returns) afterwards every physical line rather than merely between paragraphs.
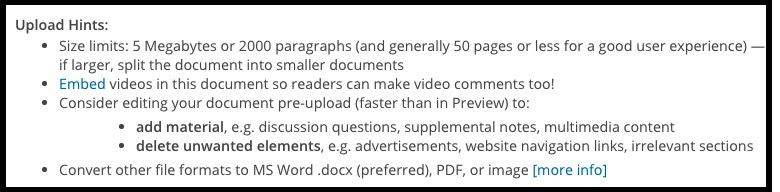
Note these general upload hints and limits:
Nosotros'll at present explain how to upload each format in particular:
- Microsoft Word and Excel — .dr., .docx, .rtf, .xls, .xlsx file extensions
- Create a folder on your Mac or PC so that it will be easy for you to locate the downloaded images in Step TWO, below.
- You lot will also demand to change your browser settings to utilise this binder equally the default for your downloads. Run into: How To Change The Default Downloads Folder On Your Mac OR How To Change Default Download Location In Windows 10.
- If you are using Google Slides : Click on each slide, one at a time, and download each as an individual epitome. Click a slide > File > Download > JPEG prototype or PNG image.
Alternative majority downloading: Open your slideshow in PowerPoint or Keynote and download the all the slides equally images in PowerPoint or Keynote. - Steps to follow: Become to File > Page setup > Choose Orientation: Landscape > All margins: 0.5 inches.
- Click Insert > Prototype > Upload from figurer. Find the images you downloaded in STEP One, above. Select all of them, and upload them together or one-by-one.
- Check to see that they are in the right social club and yet size. If needed, position and edit the images in the document.
- One time you have the images the size and in the guild that you want them to appear on NowComment, download your Google Doc as a Microsoft Word. Steps to follow: File > Download > Microsoft Give-and-take (.docx).
- Steps to follow: Go to Layout > Margins > Narrow > Orientation > Landscape.
- Click Insert > Pictures > This Device. Observe the images you downloaded in Stride One, above. Select all of them, and upload them together or one-by-one.
- Check to come across that they are in the right order and all the same size. If needed, position and edit the images in the document.
- In one case you have the images the size and in the order that yous want them to appear on NowComment, relieve your document as a .docx. Steps to follow: File > Save as a .docx.
- Prototype/Photo
- Alt text — short alternative text for those who are visually-impaired or using non-visual spider web browsers. For case, Alt text for a photo of a terminate sign might be "blood-red stop sign" (without quote marks)
- Tooltip — this is text that will pop up when someone who can see the image mouses over it. Information technology can exist the same as the Alt text.
- Copy-and-Paste from Web Folio (HTML)
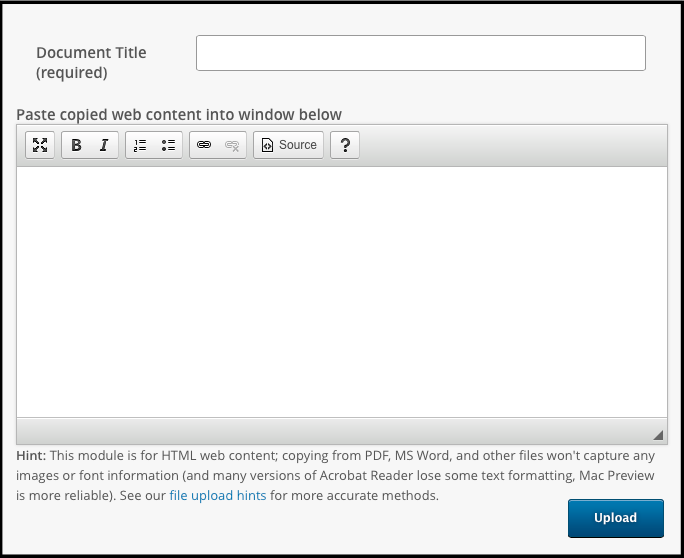
- Give your document a Championship
- Re-create all the text and images yous desire in your certificate from the desired web page(s), then paste what yous copied into the big information entry box (nether Document Title). Y'all can delete any content not needed for discussion (eastward.g. irrelevant text and graphics, advertisements, site navigation links, whatsoever!) from the information entry window to give your readers a clean, customized certificate.
- If in that location is video or audio content from that page (or from other pages or sites!) that you also want in your certificate, re-create and paste the embed codes from each media thespian (run across next department); copying the media role player itself, unlike copying text and images, volition not work.
- Click the blueish "Upload" button (toward the bottom right corner of your screen) to upload your document
- copy-and-pasting various text, images, and media player embed codes from various sites into the initial certificate upload, or
- later appending new material (eastward.g. adding a video to an MS Word document)
- PDF, Excel, PowerPoint, MS Word, and other documents in proprietary formats, fifty-fifty if online, are not really HTML, and copy-and-pasting their content into an HTML data entry window won't give good results. For file conversion tips see our upload hints page.
- In that location are editing control buttons at the top of the copy-and-paste window:

The icons (reading left to correct) permit you:
- Maximize the size of the data entry window (full screen)
- Bold text
- Italicize text
- Format text equally a numbered list
- Format text as a bulleted listing
- Create a hyperlink
- Remove a hyperlink
- For those comfortable working with HTML, employ the "Source" button to view the HTML source… or edit and then upload the certificate's HTML markup for maximum control over your document's display
- Go additional "Help" data on these controls
- "Text I'll Write At present"
A directory window will immediately open and then you tin select your upload file:
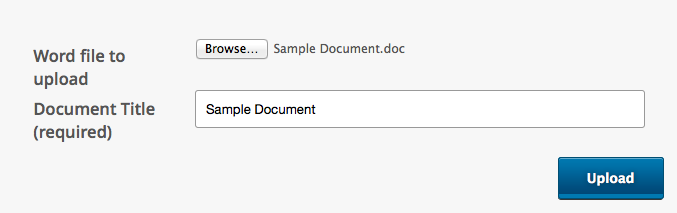
Once selected, you can use the file proper name every bit your document championship or, more than commonly, give the document a more than explanatory name (if you change your listen about which file to upload you tin choose another file by clicking the small gray "Choose File" button next to the proper noun of the currently selected document).
Now click the bluish "Upload" push (toward the bottom right corner of your screen) to upload your certificate.
1A. Uploading a Microsoft Word certificate subsequently Inserting Multiple Images of a Slideshow
✔ Take a moment to quickly scan all three steps, and notation that these are pretty piece of cake moves that you probably already know how to practice. All yous accept to do is DOWNLOAD, INSERT, and UPLOAD. The details and links are here to support you in this process.
Stride ONE. Download each of the slides from your slideshow every bit an image.
✔ Bank check to run across that you lot have a group of image files on your computer with .jpeg or .png extensions. Each file is one of the slides from your slideshow.
Step TWO. Insert the images into a Google Doc OR a Microsoft Word certificate.
Google Docs: Open a new Google Document and insert the images later on changing the page settings.
Microsoft Word: Open a new document in Microsoft Discussion and insert pictures after changing the folio margins and orientation.
✔ Check to see that y'all take a Microsoft Give-and-take (.docx) file on your computer with the images from your slideshow inserted and sorted in the order of your presentation.
Footstep THREE. Upload your Microsoft Discussion .docx to NowComment.
Encounter Basic Document Uploading and 3. Create and Add together Documents to Group Collections.
✔ Check to see that you have a NowComment certificate with the images from your slideshow prepare for discussion. Yous tin can invite individuals and groups to add comments and replies to your document.
Once y'all've selected a PDF file and specified a document name, NowComment will use a third-party converter to turn your PDF into an HTML document. The converter will ask you two questions (i at a time, but both shown hither):
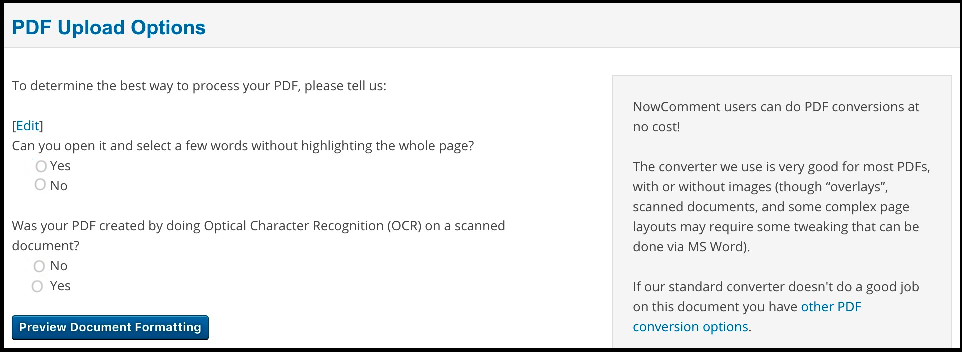
If your document doesn't come out well-formatted, see other PDF options. Prototype overlay issues are discussed beneath.
You tin upload a document containing simply a photo or other epitome and comment on it with our prototype toolbar. At whatever bespeak afterwards you tin also append text and/or video and/or some other image to the image y'all've uploaded.
NowComment handles JPEG, Png, Gif, Tiff, and SVG formats. We strongly suggest fugitive Tiff considering most browsers tin't display that format.
Image file uploads work basically the same way equally other file types:

except that it is good practice to also provide information for ii prototype-specific fields:
You tin at present click the blue "Upload" button (toward the bottom right corner of your screen) to upload your paradigm.
4 easy steps:
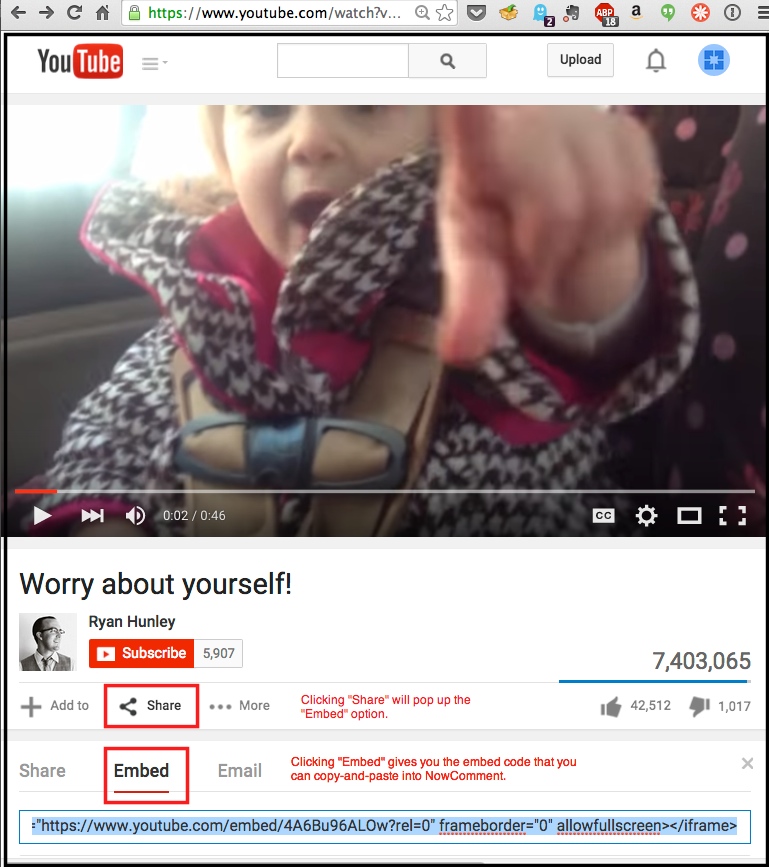
For video and audio players, paste their embed codes (sometimes referred to as "Share" or "Sharing" information) into the NowComment data entry box wherever you want that media player to announced in your document; you have control over the folio arrangement! We recommend that you lot utilize the Edit Menu of your operating system to do the pasting of the embed code (what some of them telephone call call "Paste and Match Style") instead of but doing a regular "Paste" via Control-V or Command-V; this ensures that you lot're non inserting any extraneous HTML formatting from the embed lawmaking that might interfere with our software.
Over again, notation that copy-and-pasting the media histrion itself won't work!
Hither's a YouTube example of where to find, and so copy-and-paste, an embed code:
You can have content from multiple websites in a single NowComment certificate, either by:
Hints for Copy-and-Paste Uploads
Y'all tin can write something on the spot with this selection, e.g. a quick note or an thought y'all'd like some quick feedback on. You can add HTML web content to it if yous wish. This module looks and works just similar the Web Content (HTML copy-and-paste) module above.
In one case you lot've titled and uploaded your certificate, NowComment will then preview your certificate'southward formatting (note the faint red word "Preview" in the groundwork) and make pocket-sized edits (e.m. fixing typos):
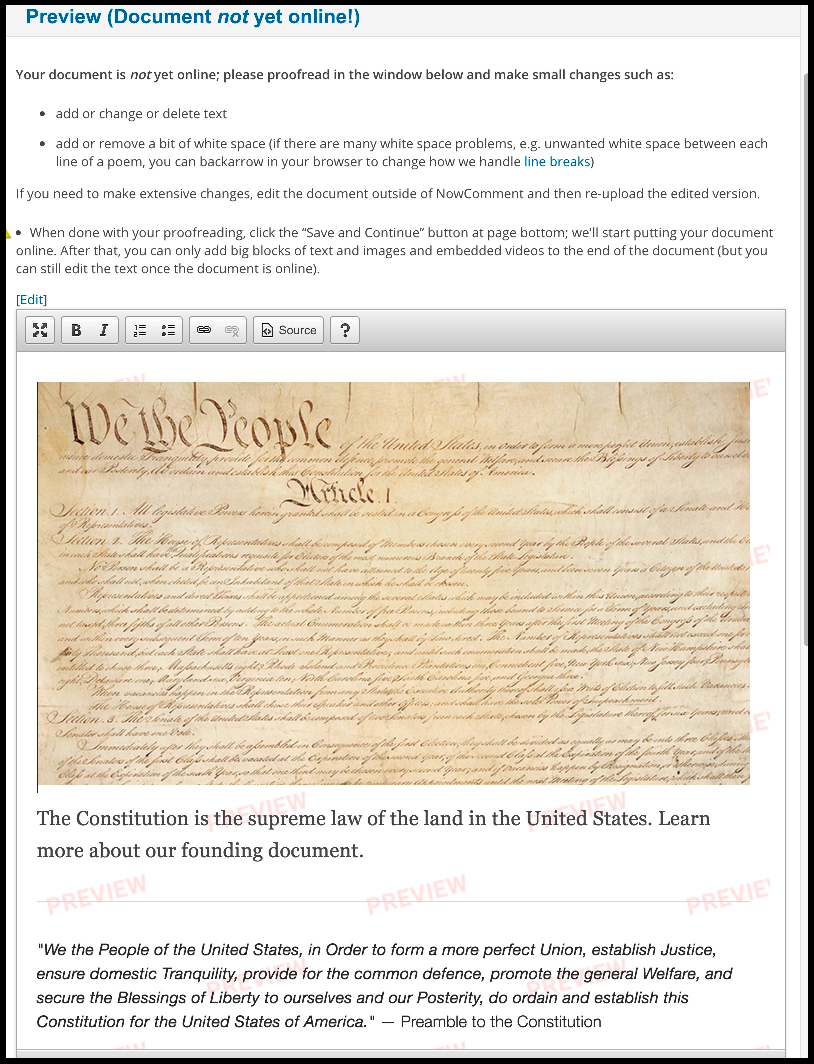
Text and images will appear in the Preview window; video/audio media players will not, but every bit long as the video/audio embed code is showing in Preview the player will appear online when the certificate upload is finished.
If NowComment detects multiple "paragraphs" that don't end with punctuation (perchance from trying to re-create-and-paste a PDF or other file with extraneous carriage returns) it will prove yous an excerpt of your document:
- as currently formatted (with mayhap divide paragraphs), and likewise
- with lines joined (possibly restoring coherent paragraphs)
You then chose which formatting you prefer; you probably don't want to join lines in poems and another special case documents (but in these cases you lot should utilise line breaks instead of wagon returns, meet our tips on avoiding unwanted white space).
If extensive changes are needed, or if the document's formatting is a trouble, information technology's best to make the edits exterior of NowComment and then re-upload the document. Merely if you're satisfied with your document, click "Keep".
NOTE: NowComment can display the vast majority of images without problem. Some PDFs and Microsoft documents, however, contain "overlay" images that look like a normal paradigm but accept both a text layer (e.g. the names of states) displayed on top of an image layer (due east.g. a map of a country). HTML, the bones building cake of the Web and NowComment, can't display such two-layer images properly (amongst other problems, they use "absolute positioning" which doesn't piece of work with browser windows of various sizes. If NowComment detects overlays we'll flag the problem before you lot reach the Preview page and will nowadays some workaround options. For more information run across our overlay documentation.
You can so select the following advanced features for your document:
- set date/time due (with optional email reminder)
- set Minimum and/or Maximum number of Comments
- don't let others read this certificate before a engagement/time I set
- don't allow others comment earlier a date/time I set
- don't permit others see comments earlier a appointment/fourth dimension I prepare
- let anyone on the Internet read this document (a "Public Document"
- electronic mail me all comments on this document ("Updates")
- disallow Revision Suggestions for the document text
- all invited users tin can append content
- customize meanings of highlight colors
- supply bibliographic document information (metadata)
- show me private replies as well — users will be warned [Note: used mainly when an Instructor needs to meet private comments between students]
- turn off the Image Commenting toolbar (useful in cases where the page aesthetics are disquisitional and the NowComment toolbar would be out-of-identify)
Assignment Fields
Fourth dimension Controls
Special Features
An "i" data icon appears next to each option explaining it more fully. If an advanced characteristic is set via the 's "Edit Properties Page" NowComment will take yous to that page direct.
When done reviewing these optional features, click "Proceed" and your document will begin uploading.
A yellow bulletin area at the meridian of the adjacent page will show y'all the status of the upload, eventually ending with a message "Your certificate is prepare; view information technology now!":

Your document is at present online; click the "view information technology now" text link to become your certificate and offset commenting on information technology, and/or share information technology with others.
This isn't necessarily part of uploading a document, but it lets y'all upload a document just once fifty-fifty if y'all want multiple groups/classes to annotate on it separately from each other.
From your My Library folio (Options menu) or from the "More" dropdown menu when reading the document, choose "Copy". You'll and so accept 2 options (on two tabs):
- Make Multiple Copies (no copying to Groups)
- Brand Multiple Copies and Share them with Groups
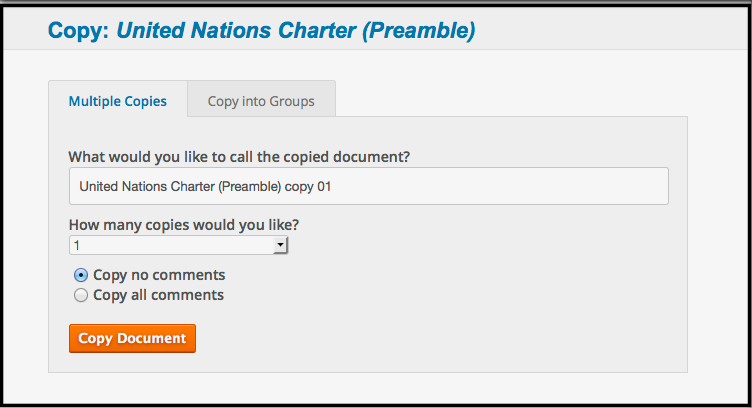
If you lot aren't using Groups, specify how many copies you want, what suffix should be appended to each document and so you can distinguish the various copies class one some other (default is copy 1, copy 2), and whether existing comments on the original should or shouldn't be carried over to each copy (teachers might want to "prime number the pump " past inserting some notes or questions as comments).
The paradigm below looks similar the ane in a higher place, but the 2nd (rightmost) tab is shown here.
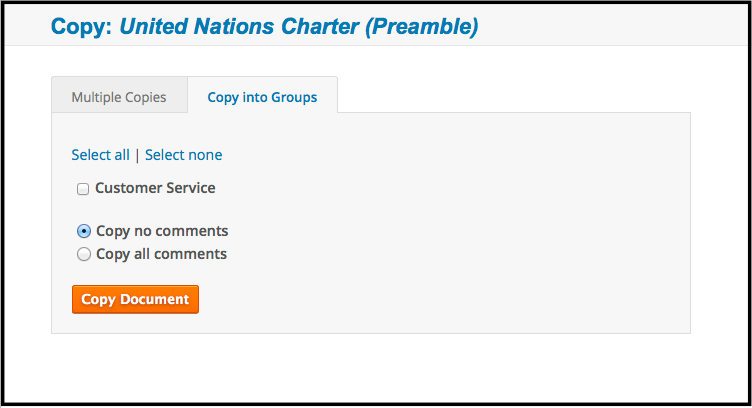
This characteristic pulls up a checkbox list of all the Groups you're an Admin for (in the screenshot example above there'south just the Customer Service grouping) and lets you share a copy the document with each Group you click on (or click the "Select all" link for all) and automatically invite each selected Grouping to the document… all in a single footstep! The Grouping name is automatically used as a suffix at the end of the document name so you lot tin can distinguish the copies from one another.
That'due south all y'all need to know about uploading documents. It's very easy and just takes about a minute; try uploading a exam document now!
We have other videos and tip files to help y'all get the most out of NowComment … and do take a look at our "Features Gallery" overview.
[Last updated: Jan 7, 2022]
NowComment sometimes uses Abbyy tools for PDF upload. Abbyy requires the following legal notices:
This software uses ABBYY® FineReader® Engine eleven 2013 recognition technologies © 2013, ABBYY Product LLC.
ABBYY and FINEREADER are trademarks of ABBYY Software Ltd., which may be registered in some jurisdictions.
The employ of Type i fonts for export to PDF:
© 2001 ParaType Inc. © 2003 ParaType Inc. Opening DjVu images: © Portions of this estimator program are copyright 1996-2007 LizardTech, Inc. DjVu is protected by United states patent No. vi,058,214. Foreign patents awaiting.
U.Due south. Patent Nos. 5,490,216, five,625,465, 5,768,416 and vi,094,505.
Abbyy licenses JasPer Version 2.0.
Source: https://nowcomment.com/help/uploading_documents